If you don't know, Quadrilla is a simple modular wooden marble run. The kids spent much of the day running marbles through a couple of the instructions-included models. Not just one at a time either; the only thing constraining the number of marbles running at any given time was the speed which they could pick them up off the floor and the number they could hold in their hands. I'd wager max concurrency at somewhere around 70 marbles. The kids are obviously fascinated by making the marbles go all crazy, but after knocking down the first setup, their attempts at building one on their own were quickly abandoned. I cracked open the instructions and built another model, and they kept playing.
After they were in bed, however, I thought I'd try my hand at building a totally custom model. You remember when I said "simple" earlier? I was totally lying. The rules for construction are incredibly simple, but the complexity enforced by the modules themselves is rather high. It seems like there is a lot of flexibility with the different blocks, but while that's not inaccurate, the flexibility is within a world of draconian constraints.
Anyway, after 83 test marbles over the course of about an hour and a half, I managed to assemble a model that I'm reasonably pleased with. I had a few design goals in mind from the get-go:
- must have a single marble entry
- must have a single marble exit
- must use the 90° flip-flop (none of the instructions-provided models did)
- must use a bunch of 180° flip-flops
- every bit of raceway must be reachable (no dead or partially dead segments)
- no bit of raceway may be reshared after splitting (all the instructions-provided models rejoined before resplitting)
- minimize the number of test runs (both the kids and my parents was already asleep)
The 90° flip-flop was a pain in the butt to use, but that's mostly due to the fact that the set I was using was the Twist set, so the segments were all curves. If the segments were linear (as in the Rail set), it probably would have been easier. I only used two 180° flip-flops for their intended purposes (the rest served as "dumb" support blocks in the unused levels of the columns). I'd hoped to use more, but goal #6 prevented it with the pieces I had available.
I won't know until morning if I succeeded at #7, but I think I did. At the very least, I wasn't louder than the howling winds outside.
The trickiest part was managing vertical space while still meeting goal #6. I managed to only have two columns with three layers of "dead" modules, and one of those was just so I could use the second helix (spiral, frying pan, whatever) as a launch point. The module which would have made it far easier would have been a vertical 90° flip-flop, but there is no such thing.
Overall, however, I managed to build what I'd hoped to. After the first fifteen or twenty minutes, I wasn't so sure I was going to be able to pull it off. It seemed like everything I wanted to do wasn't allowed by the modules available. But I managed to figure out how to solve the problems other ways, or at least reroute to avoid the problems, and got it done.
Here's a few pictures I took of the finished product:
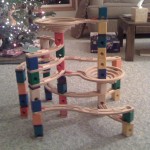
 This is the front of the model. The marble exit is the green module at the center of the bottom curved section. Since there are four paths, there are four ways to get to that block: from the left, from the right, from the helix, and from the raceway that ends under the helix. The first natural module above the exit module is shared between routes three and four, but it's not raceway, so it doesn't violate goal #6.
The exist was the first bit I threw together. I liked the concavity, so I kept it. It was a pain to maintain that arrangement as I got further along, but I got it to work. It also makes for a nice pile of marbles in that cavity after you run a bunch through.
You can see all three flip-flops here as well: the two 180° flip-flops are the red modules with the large grey dots (center-center and right-rear columns), and then 90° flip-flop is the red module spitting out onto the lower helix.
You'll also notice the purple spacers in the center-center and center-front columns – they could have been placed below the lower helix in both columns without interfering with any raceways and avoid the unnecessary two-plate drop out the front of the 90° flip-flop (there would still be a one-plate drop). As you'll see in the left-side photo, it would also have allowed me to use a module in the center-center column instead of five spacer place. But by the time I had it all working, I didn't really want to tear it apart enough to make that change.
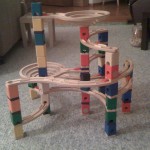
 The left side of model shows route four (the raceway under the lower helix) better. It originates in the right-rear column, and passes through the center-center column.
Marbles are introduced in the uppermost module, and all go through the first helix. Exiting the helix they hit the first 180° flip-flop and are either routed to the right side (more later), or sent through a short out-n-back to come to the 90° flip-flop and either be sent to the lower helix or out to the left side to run the serpentine race to the front and exit.
 The right side has the second 180° flip-flop which either sends marbles along the right-side serpentine race to the front, or through another short out-n-back to the center-rear column before sending them through the central raceway to exit beneath the lower helix.
You can clearly see all three flip-flops from this view as well, though the 90° one just looks like a plain red module (other than the accelerator at it's front).
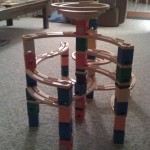
The final view of the back isn't terribly exciting aside from giving a  better perspective on where exactly the right-rear, center-rear, and left-rear columns are in relation to one another.
Interestingly, the center-rear column (closest to the camera) is completely floating. It has a single anchor point: the right-rear column. However, it's geometry is rigidly enforced by the 180° flip-flop that feeds it. So it has to be pretty much exactly where it is. I'd originally hoped to have the short out-n-back that it provides go all the way over to the left-rear column (eliminating the need for a center-rear column at all), but I couldn't interleave the two out-n-backs without that aforementioned vertical 90° flip-flop.
The rest of the structure is locked in it's relative arrangement because of the incompatibility of the large curved segments and the serpentine segments to mutually realign their vertices. If the lower exit raceway (right-rear to center-front) wasn't there, then the whole thing could pivot (as it'd be basically a parallelogram), but that raceway locks a triangle into one of the corners, thereby locking the whole structure.
Here's to spiked eggnog and an evening playing with toys! Happy Christmas, or whatever you're celebrating as this year draws to a close.
My son and I love Quadrilla! It's one of his favorite toys. He's asked Santa for more extension sets for it, and I think he might get them ;-) Thanks for sharing!
Merry Christmas!